Please read entire document prior to beginning Expansion Joint Installation. The recommendations in this document are to be used as a guide. Please use these instructions in conjunction with the approved drawing provided by U.S. Bellows. The approved drawing should be considered the governing document.
1. Receiving and Storage
Follow U.S. Bellows’ Receiving and Storage Instructions
2. Pre-Installation Checks
- Confirm dimensional data per U.S. Bellows’ approved drawing.
- Confirm duct/duct flanges are in good condition.
- Confirm duct/duct flanges are lined up correctly (ensure that lateral displacement and angular movement do not exceed agreed specifications)
- Prior to installing the expansion joint frames, the opening into which the expansion joint will be installed must be inspected to verify that the opening is in accordance with design tolerances. The expansion joint is not designed to accommodate installation misalignment, unless clearly specified as a design requirement.
- Make available the following tools/equipment to simplify the installation:
- Suitable/safe scaffolding
- Lifting equipment (fork lift, crane, hoist)
- Drill
- Come along
- Rope
- Pry Bar
3. Assembled Expansion Joint Installation
- Use the U.S. Bellows drawing as a guide for dimensional information.
- Clean duct/flange surfaces and prepare for welding or bolting.
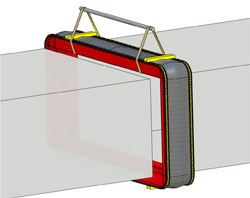
- Using proper lift equipment, attach suitable lifting “straps” to the expansion joint. Do not lift the expansion joint using the shipping bars.
- If the expansion joint has a liner, make certain that the flow arrow of the expansion joint/liner is in the proper system flow direction.
Weld In Design — DUCT IN PLACE
The following instructions are used when ducting is in place and cannot be moved for expansion joint installation.
- Lift expansion joint into place using sufficient straps.
- Fit up and tack weld one flange of the expansion joint into place. During any welding operation, protect fabric belt material from potential weld splatter.